Promxox has an extremely simple to use backup feature that can get your backups running in only a few clicks. In this guide, we are going to show you the basics.
Backup Proxmox VE VMs and Containers Easily
The first step in making a backup is to have a virtual machine and also storage for the backup. We are going to assume you have a virtual machine already deployed. One reason that many users do not realize that Proxmox VE has great backup features is that they test Proxmox VE on a single node, with a single type of storage, and without network storage. Simply put, step 1 is really ensuring you have a place to backup to. Not all types of storage in Proxmox VE support being backup targets. What is a valid backup target can change over time, but generally, one aims to use network storage. If you have an extra ZFS array in a system, it may not be a valid backup storage type.
We frequently utilize network storage, with NFS being a typical example. For instance, if you export a ZFS array from a Proxmox VE server as an NFS share and then add that storage to another Proxmox VE host, it becomes a valid option. Despite the popularity of network storage, Proxmox VE supports a multitude of other storage types.
Just for an example, we configured a host with a ZFS mirror which we then exported as an NFS share called “backupnfs”. This could also be done using a TrueNAS, Synology, or QNAP NAS as a backup target. Typically, our intention is to export storage and import it into Proxmox VE within the Datacenter -> Storage -> Add pathway. Following this, you can navigate to Datacenter -> Backup -> Add to access the main screen.
In this scenario, our selection included the backup NFS server and an older Gitlab VM on node 14 as the VM for backup. Proxmox VE offers various options for including or excluding certain VMs. Normally, we find it simpler to select the VMs from the list and choose to include the selected VMs.
Upon selecting the VM and storage, we set up a schedule. Although you can edit this later, you might prefer a backup every 30 minutes or maybe once a week. There are numerous pre-set scheduling options available, so we suggest selecting the one that best suits your needs for easier editing later.
If you are occupied at 21:00 for your routine backup default, and would prefer the backup to occur afterwards at around 23:00, you can simply modify the time. This can be adjusted at a later point if needed.
You can enter an email into the “Send email to” field, under which the “Email” default is to notify always. However, if you are setting up backups every half an hour, this may be too often. In which case, you might only want to be informed when there is a failure, and so you would select “On failure only.”
Following is the “Compression” option. In this case, it is recommended to use ZSTD unless there is a compelling reason against it.
The next choice to consider is the “Mode”. It is anticipated that a majority of our readership would prefer to snapshot rather than completely suspend or halt a VM. With snapshot mode, Proxmox VE will postpone until it secures the filesystem lock to execute the snapshot, following which it will generate a VM snapshot and backup the snapshot as of that point. The advantage rendered by this method is that it does not require the VM to be shut down.
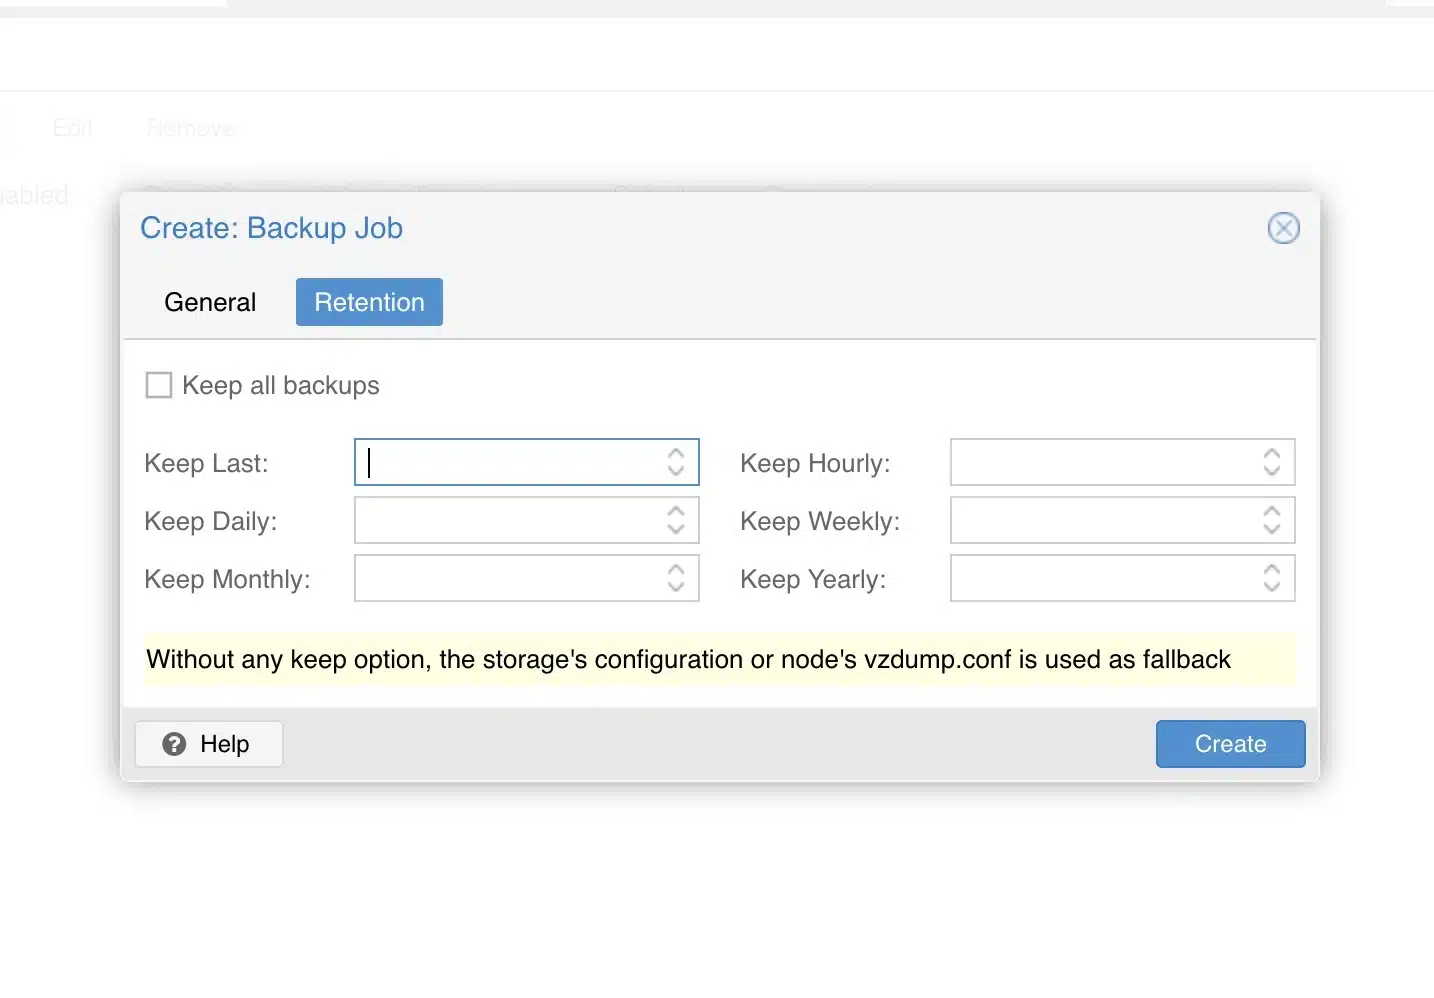
At this juncture, you’ve got a backup job lined up. However, it’s crucial to navigate to the next tab. Upon tapping on the Retention tab, retention possibilities emerge. This is the place to determine these options if you wish to maintain backups on an hourly basis for the past 24 hours, daily backups for the past week, and weekly backups after that point.
While it might appear insignificant, the volume of backups can add up if you have a system with ten VMs, each creating a daily backup.
Recovering from Proxmox VE Backups
Restoring a VM from a backup is a straightforward process. Simply head to the VM, select “Backup”, and then choose the backup’s date and time you wish to recover. Additionally, this restoration can be done to a different storage location.
One interesting tip is the ability to select the backup storage, for instance, backupnfs, to view all the backups contained therein. You’re not just limited to backing up to the original node and cluster. You can create a backup in a different node of a completely different cluster, as long as it has access to the backup storage.
In Conclusion
We hope that this advice will guide our readers to easily backup their virtual machines. Proxmox does provide a default backup solution, known as Proxmox Backup Server. However, because a lot of our readers experiment with Proxmox VE using limited network storage, many are unable to test the backup function. We are confident that this brief guide will assist our readers to carry out quick and effortless backups with Proxmox VE, eliminating the need for an alternate backup solution.
ColoCrossing excels in providing enterprise Colocation Services, Dedicated Servers, VPS, and a variety of Managed Solutions, operating from 8 data center locations nationwide. We cater to the diverse needs of businesses of any size, offering tailored solutions for your unique requirements. With our unwavering commitment to reliability, security, and performance, we ensure a seamless hosting experience.
For Inquiries or to receive a personalized quote, please reach out to us through our contact form here or email us at sales@colocrossing.com.

